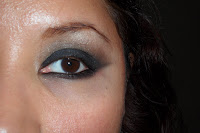
I love doing a smoky eye, but I know that it can be a little intimidating at first. Rule # 1 is to always practice a new look and to remember that make up is washable if you don't like the result. I'm going to break down the smoky eye into small steps. Also, the colors can always be substituted using the same technique. You can have a purple or blue smoky eye. There are no limits in make up.

Step #1= Always prime your eyelids. I use Urban Decay Primer Potion to prevent creasing. Next apply a dark base on your eyelid only (do not go above the crease). I used MAC paintpot in Blackground, but you could use anything. You could use a black eyeliner as a base.

Step #2= Apply a black eyeshadow over the base color you previously applied. This is to intensify the color and make it last longer. It's amazing how easy it is to find a matte black eyeshadow now. I used Lucifer from the Kat Von D Ludwig palette, but I know CoverGirl and Wet n Wild both have black eyeshadows. MAC has Carbon black eyeshadow. I decided to wing out the eyeshadow a little bit.

Step #3= Apply a brown color in the crease and above the crease. The trick to having a smoky eye, is that it's supposed to have a gradation in color. From black to brown to light. Make sure those two colors are blended. I used Leather from the Kat Von D Ludwig palette.
Step #4= Apply a highlight color under the brow. Blend the light color and the brown color so that there are not any harsh lines between the two. I used Tequila, again from the same Kat Von D palette.


No comments:
Post a Comment